How To Make Your Windows Pop With Paint

(Photo, Christie Vuong. Prop stylist, Jenn Park Krulik. Produced by Stephanie Han Kim. End tables, vases, artwork, canister and candle, homesense.ca. Sculpt velvet accent chair, crateandbarrel.ca.)
When it comes to paint, sometimes less is more. In her living room, Chatelaine editor Maureen Halushak opted to paint her window's white trim a punchy shade of blue to inject some personality into the white space.

With the help of Toronto-based decorator Elias Blunden-Stone (a.k.a. The Room Editor), she picked Benjamin Moore’s Delphinium CC-872 to make her accessories stand out and create continuity with the wallpaper in the hallway, which has a floral pattern with a similar shade of blue.
His top tip for picking an accent hue? Look around the room for existing pops of colour. “I work with what people have,” he says. “I often pull colours out of book spines, photo frames or record covers—my goal is to help people find and amplify their style based on what’s already there.”

Materials
- Paint for trim
- 2.5-in. angled brush
- Painter’s tape
- Drop cloths
- 120 grit sandpaper
- Rag
- Leftover wall paint for touch-ups
- Small paint brush
How to paint a colourful window trim accent
Pick your paint

Some paint finishes are more durable than others and give different results. High-gloss paint is durable and impactful, but tends to highlight imperfections and unevenness in the surface, while matte paint is forgiving, but more likely to get damaged. For this project, we opted for semigloss for a fuss-free and durable high-impact finish.
The type of paint you should use depends on what the surface is made of. If you’re painting over wood, a water-based product is the way to go. (If you're painting the window frame as well, keep in mind that it's likely made from a different material than the trim.)
For exterior window trim, consult a paint expert as the steps may differ.
Sand the surface

“The number one mistake people make when painting is not sanding,” says Benjamin Moore colour and design expert Sharon Grech. “Roughing up the surface allows the new coat of paint to adhere to the trim better.”
Use a fine grit (we went with 120 grit sandpaper) and keep a damp rag on hand to wipe off the residue.
Tape along the trim

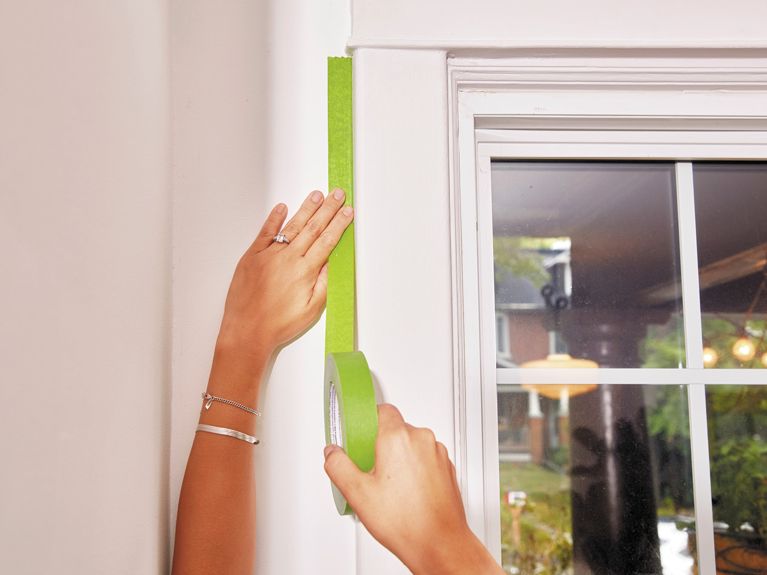
With painter’s tape, tape the wall and the casing along the trim to protect surfaces you don’t want to paint. To avoid bleeding, “take your thumb and rub along the edge of the tape to make sure it’s smooth,” Grech says. Experts swear by FrogTape, which gives sharp, crisp lines.
To make removal easier, work with long strips of tape instead of piecing smaller ones together.
Don't forget to protect your floor with drop cloths before you star. (These drop cloths come highly recommended by Amazon reviewers, with over 2.3K 5-star reviews.)
Start painting

Using a 2.5-in. angled synthetic brush (like this one, which has over 1K 5-star reviews), apply two to three coats of colour, letting the paint dry completely between each coat. (Follow the paint company’s guidelines.) Grech recommends painting in light coats for a smoother final result.
As a general rule of thumb, there’s no need to prime when painting wooden trim, she says, especially if it's a clean white hue. However it depends on the type of trim you are working with.
Do your touch-ups

Use a small craft brush to fill in any missing spots or tight corners, where the angled brush can’t reach. And make sure to use a quality brush—you don’t want to have to pick bristles out of your paint job.
Have leftover wall paint? Use it to go over any spots where the trim colour has bled.
Remove the tape

Peeling off the tape too soon can result in bleeding. “But don’t wait until the paint is dry,” warns Grech, noting that it can cause paint to chip off and ruin your crisp line. Let the paint get dry to the touch, then remove.
Slowly pull off the tape at a 45-degree angle, moving away from the trim to avoid touching the paint.
How to clean paint brushes
Materials
- Plastic wrap
- Elastic band
- Dish soap
Wrap them up

Between coats, tightly wrap your brushes in plastic wrap and secure them with an elastic band to keep them from drying out. This method also works overnight if you need to put your project on hold and don’t have time to clean and dry your brushes.
Rinse after use

When you’re done painting, rinse brushes with warm water, paying special attention to the base, where paint tends to get stuck. (Dry brushes are much harder to clean!) If needed, use a little dish soap. Grech advises against soaking brushes.
Take them for a spin

Lay your brushes flat to dry to avoid damaging the bristles. Grech also likes to roll the handle of her brush rapidly between her palms to get rid of excess water. (It can get messy, so make sure your sink is deep enough before trying this at home.)
This article contains affiliate links, so we may earn a small commission when you make a purchase through links on our site at no additional cost to you.
GET CHATELAINE IN YOUR INBOX!
Subscribe to our newsletters for our very best stories, recipes, style and shopping tips, horoscopes and special offers.